We're going to try and do a very low budget wedding so I'm going to need to make/borrow a lot of things. With all of the weddings happening in my life over the next year and a half (5, counting my own) I'm going to start early and do what I can, when I can! My fiance was out having a boys night last night so I went to Hobby Lobby (I should seriously consider having my paychecks direct deposited there) and while I wasn't planning on starting any wedding crafts yet I saw that they were having a canvas sale and I couldn't stop myself!
For the longest time I've had this idea of a thumbprint tree pinned. I loved the idea because a) I knew I could make it myself and b) I think its awesome because it's something that we won't just put away and never look at again, we can frame it and hang it up in our future home!

Things you will need:
-A canvas
-Acrylic paint
-Tree Clipart
-Printer
-Chalk
-Computer
A more detailed step by step process on how to make DIY canvas art can be found here. I didn't take as many pictures for this one, but its the same idea, I just used different clipart and designs.
Step 1: Use your computer to make a Publisher document the same size as your canvas (mine was 16x20). Design your canvas the way that you want it. I decided that I wanted to do essentially the same thing as the one you see above, but in different fonts and a different tree. You can find clip art using Google or, if you want to spend a few bucks Etsy has some super cute instant download clip art. I used tree clip art we bought for my sisters wedding programs. The exact one can be found here. You can probably find a cute one on Google for free though!
Step 2: Print your publication. Now obviously you are printing on 8.5x11 pieces of paper and your project is 16x20 so you're going to have to select the "tiled" option under the print set up. This will give you multiple pieces of paper you're going to need to put together with some tape. It seems like a pain, but its definitely worth the extra effort to get it looking how you want it.
 |
| My taped together template. Yes I realize I put 2013, but I was just playing around with placement, we aren't sure if this will be our for sure date yet |
Step 3: Cover the back of your template with chalk. (I didn't paint the canvas, I wanted to leave it raw but you can paint yours if you want. If you do decide to paint the canvas that should be your first step to ensure its dry by the time you're done designing) I used a light brown chalk and it was almost too light, be sure you take into the color of your canvas into account before you start chalking up the back.... use darker chalks on light colors and light chalks on darker canvases. You might think this seems obvious but you're going to be PISSED if you spend all that time tracing and you can't see the lines! Wipe off the excess chalk from the back of the template with a paper towel.
Step 4: Trace the outline onto the canvas using a pen. The tree outline I used looks really fun and whimsical but let me tell you...... it took a LONG TIME to trace and even longer to paint. Keep that in mind when you're designing a template.
Step 5: Start painting!
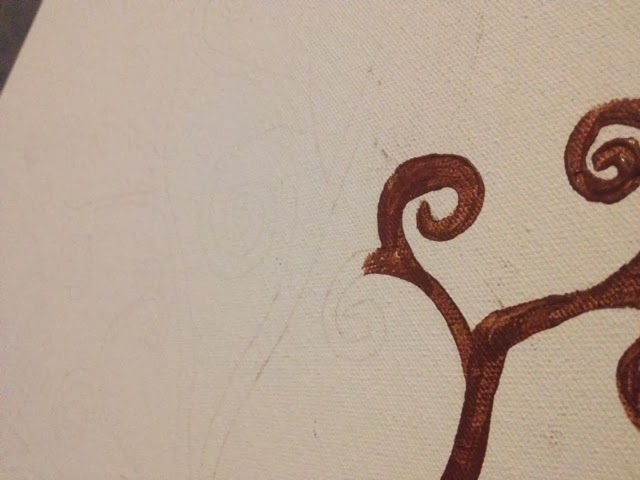 |
| You can see how faint the trace lines are, I didn't use a dark enough color |


I'm so excited to start making things for my wedding and start getting things together for my closest friends' weddings! I did a super cute DIY "Will you be my bridesmaid?" gift for all the girls I'd like in my wedding, but I can't post them until everyone gets theirs!
Stay tuned! The year and a half of wedding extravaganzas has begun!
No comments:
Post a Comment