Sunday, January 5, 2014

DIY Word Banners

I made a bunting for my sisters bridal shower back in June that said "From Miss to Mrs" that we hung over the food table.

I did it using scrapbook paper, I measured and cut all of the flags by hand, and it ended up getting all crumpled and wrinkled afterwards so I cant reuse it for any of my other friends' showers coming up.

I saw this cute idea for a gift table on pinterest and decided that, when we got closer to our wedding (I didn't want this one to get crumpled because it was sitting around for a year) I would painstakingly make another banner.


Then I (surprise!) went to Hobby Lobby and found these awesome premade chipboard pennants for 50% off (aka $2 for a pack of 7) and I couldn't resist.Well... I probably could've resisted but why bother? My wallet was stuffed with Hobby Lobby gift cards (thank you Santa!).


Here are some directions on how to EASILY make your very own lettered bunting.

Things you will need:
-Premade pennants (There were burlap,cloth, and chipboard options at HL)
-Paint (both the color of the flag and the color of the lettering you want
-Paint brushes
-Wax Paper
-Computer
-Printer
-String or ribbon to hang the finished flags on

Step 1: Paint  your flags the desired color. My wedding colors will be a deep yellow, light gray, and white, so I painted my flags white. After you paint one side I suggest that you lay them on Wax paper to let them dry. That way if something dripped to the other side it won't pull up newsprint when you pick it up.


Step 2: After one side is dry repeat with the other side.

Step 3: While you're waiting on the paint to dry make the letters for your flags. I went into publisher and made a triangle template that was the exact dimensions of my flags (the dimensions were on the packaging). Then I inserted wordart in the font that I wanted so I could stretch it to be the side I needed.


Then all you need to do is copy and paste the number of letters you will need and change the letter to make the words you want. I also did the same with a piece of heart clipart for the spaces. The font I used is called KG Only*Hope if you're interested in using that one. Its fun because all of the letters are different in both lowercase and capital.

Step 4: Print out the letters and cut them out. Leave a bit of space on all sides to give you room to hold the paper down when you are tracing.

Step 5: Trace the letters onto the board using pen. If you are using a cloth or burlap pennant you will need to chalk the back and follow steps 2, 3, and 4 seen here.


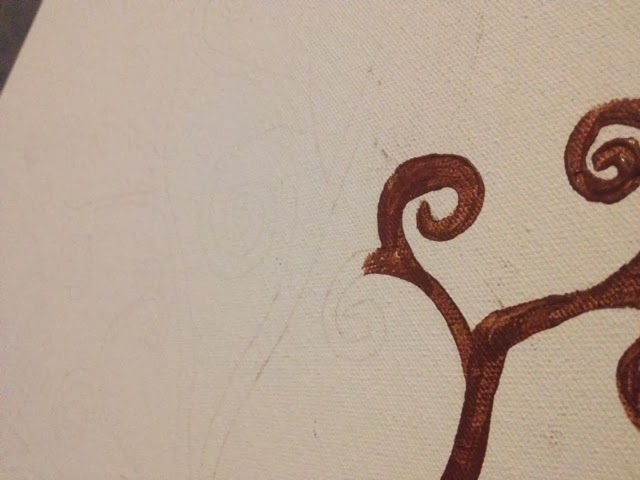
Step 6: Using the paint that you want, fill in the outlines you just traced.I blew up this picture so you can see the slight indentation marks that you should have after you trace the lines out.


Step 7: After all of the letters have dried you're ready to string them up! This next part can be done lots of different ways with lots of different materials. You decide what's best for you.

If you use a thick ribbon the pennants probably won't slide around so you wont need to tie knots. I used Jute to get a rustic look so I wanted to tie knots to make sure the flags stayed spaced evenly.

I threaded mine over/under so that the knots went in the front and the jute went in the back. If you have a pretty ribbon that you want to show off you can thread it under/over and the ribbon would show in the front.

Step 8: Trim the ends and stand back and admire your work. Or in my case call for your fiance and demand that HE admire your work :)


You can do this with pretty much anything. You could even use scrapbook paper of different patterns and glue it to the front for a cute mis-matchy pattern background....  That would take longer but I think it would be really cool looking.

I made a really awesome string art project over New Years Day that I'll post about next. I didn't have enough string to finish it, but once its done I'll share!

Happy Crafting!

Thursday, January 2, 2014

Happy New Year

Happy New Year from my little family to yours! 

I spent all of New Years Day crafting so I've got some sweet wedding projects to post about soon! 

Tuesday, December 17, 2013

Make a cute engagement gift!

Everybody I know is getting engaged and married lately. My future brother in law proposed to a fabulous girl the week after Jeff and I got engaged and my fun loving bestie had a magical Disney proposal just a few days after that!

I wanted to do something fun for them both and I saw this adorable idea on Pinterest that I thought would be really easy to recreate. A ring frame!

 I was constantly misplacing  purposefully leaving my ring in strategic areas around the house. Then a good friend of mine made me (yes, I have crafty friends too!) an adorable ring dish with my future "Mrs" name on the bottom. Now I always leave my ring in the dish and it saves me from having a mini heart attack every time I wake up in the morning!

So along those lines I made my friends custom ring frames!

Things you will need:
A photo frame
Scrapbooking paper of your choice
Computer
A printer
A pin/hook/fixture to hang the ring on

Step 1: Find some super cute frames that suit your needs! Take out the cutesy pictures that come in them.
Step 2: Choose a font that looks right for your frames. Make a square that matches the size of your frame (note these frames were 2 different sizes, hence the difference in size on my publisher document below).

Step 3: The next step you can do one of two ways. You can simply print the square onto your scrapbook paper, or you can transfer the font onto your scrapbook using this technique and then paint or draw the font on for a more handmade look. I did one of each.
Step 4: Cut out the paper and put it in the frame.
Step 5: Get together the stuff you are using to act as the "hook". I used little spools that I painted and hot glued onto the glass of the frame.


You could also use a hook like the one in the picture above and screw it into the frame back directly (obviously you would need to be sans glass) or use a push pin like in the Pinterest inspiration photo. Its up to you! I did it this way because I used paper with writing on it and I didn't want it to bleed if it got water on it, so I wanted glass to go over the paper.

Step 6: Affix your "hook" and you're all done!


 My sister had her wedding this past weekend so I'm officially on to working on my own wedding projects! I'm so excited to get started!

Update!
I made one for myself with a push pin and it took me 5 minutes total! I love it!
 

Sunday, December 8, 2013

Will you be my bridesmaid? DIY

The day after Jeff proposed I had my bridal party picked out and I wanted to do something special to ask them. There are so many cute ideas on Pinterest so I spent a little while looking and I found something I really liked (pictured below). It was a wine bottle with a personalized label saying "Will you be my bridesmaid?" I liked the idea but I wanted to make the label more "me" so I changed it up a little bit and also made some little wine glasses too because, whats a bottle of bridesmaid wine without an awesome personalized bridesmaid glass to drink it in?


http://www.etsy.com/shop/mdp7


Things you will need:
- Avery labels number 22826, you can get the on Amazon (Prime!) right here.
-Avery label 22826 template, can be downloaded free online from the Avery website, click this link to get there.
-However many bottles of wine you will need
-Alcohol (sadly not of the fun variety....the rubbing kind, though a good glass of Moscato does make crafting more fun)
-A printer
-Microsoft publisher
-Wine glasses to paint
-Enamel paints click here to see the kind I buy (one of these kits will last you quite a while... I've had mine for over a year and I do a LOT of glass painting)
-Ribbon

Step 1: Download the Avery template and copy and paste it onto a Microsoft Publisher document. You want to make sure it takes up the whole page exactly, there is nothing more annoying than printing out your project on a label sheet only to find it doesn't match up because you were a little bit off.

Step 2: Find something you like and design your label within the outline of the template. I searched "Will you be my bridesmaid" on Etsy and found some wording that I liked and used different fonts to make it my own. You're going to want to copy and paste your inspiration onto the document so you can look at it as you go along.

As you can see I played around with colors and fonts until I found something I liked. You should do the same, make it your own style!

Step 3: Once you're finished designing your label print them out! I also decided to do a back label for mine, with a photo of me and each girl and the "Established Since" date (the year I met each one). This was pretty easy I just copied the photo and fit it to the template.

Step 4: Take the wine that you got and carefully pull of the labels. I found that its better to take the time to try and get the whole thing off in one pull, it leaves less sticky residue to get off. Once you've got the labels off use the alcohol (the rubbing kind not the drinking kind) to wipe off excess stickiness.

Step 5: Lay your labels on your wine bottle, I would suggest starting at the left or right and working your way over, rather than going from top to bottom. The curve of the bottle makes it easier to do it that way.

Step 6: Jazz it up however you want! My wedding colors are going to be light gray and yellow with chevron touches so I found this perfect yellow chevron ribbon to tie to the top.
The front
My "Established Since" back with the picture
Step 7: Make your own hand painted wine glasses. I won't include directions on how to do that here... you can check out the link to a past DIY on how to do it. This is how mine turned out:

Step 8: Package them up and give them out to your girls! I included a note with mine for each girl.


The finished product on display at one of my bridesmaids' houses.

Have fun and make it  your own. Speaking from experience being asked to be a bridesmaid/maid of honor is very special, but its also a lot of work, so I think its really nice to ask in a special way.

I have some other posts to do soon about DIY engagement gifts (I feel like everyone I know is getting engaged/married so I've had lots of practice!) coming soon!

I feel like it might be weird that the Hobby Lobby manager totally knows me and greets me with "back already?!?" every time I walk in the store?

Saturday, November 23, 2013

DIY Wedding Thumbprint Tree

I made my first wedding DIY! Too soon you say? Too bad, I say! I know we've only been engaged a week but I've been waiting on this proposal for a while so lets just say that I have a seriously overloaded secret pinterest board just waiting to be crafted.

We're going to try and do a very low budget wedding so I'm going to need to make/borrow a lot of things. With all of the weddings happening in my life over the next year and a half (5, counting my own) I'm going to start early and do what I can, when I can! My fiance was out having a boys night last night so I went to Hobby Lobby (I should seriously consider having my paychecks direct deposited there) and while I wasn't planning on starting any wedding crafts yet I saw that they were having a canvas sale and I couldn't stop myself!

For the longest time I've had this idea of a thumbprint tree pinned. I loved the idea because a) I knew I could make it myself and b) I think its awesome because it's something that we won't just put away and never look at again, we can frame it and hang it up in  our future home!


 Things you will need:
-A canvas
-Acrylic paint
-Tree Clipart
-Printer
-Chalk
-Computer

A more detailed step by step process on how to make DIY canvas art can be found here. I didn't take as many pictures for this one, but its the same idea, I just used different clipart and designs.

Step 1: Use your computer to make a Publisher document the same size as your canvas (mine was 16x20). Design your canvas the way that you want it. I decided that I wanted to do essentially the same thing as the one you see above, but in different fonts and a different tree. You can find clip art using Google or, if you want to spend a few bucks Etsy has some super cute instant download clip art. I used tree clip art we bought for my sisters wedding programs. The exact one can be found here. You can probably find a cute one on Google for free though!

Step 2: Print your publication. Now obviously you are printing on 8.5x11 pieces of paper and your project is 16x20 so you're going to have to select the "tiled" option under the print set up. This will give you multiple pieces of paper you're going to need to put together with some tape. It seems like a pain, but its definitely worth the extra effort to get it looking how you want it.

My taped together template. Yes I realize I put 2013, but I was just playing around with placement, we aren't sure if this will be our for sure date yet

Step 3: Cover the back of your template with chalk. (I didn't paint the canvas, I wanted to leave it raw but you can paint yours if you want. If you do decide to paint the canvas that should be your first step to ensure its dry by the time you're done designing) I used a light brown chalk and it was almost too light, be sure you take into the color of your canvas into account before you start chalking up the back.... use darker chalks on light colors and light chalks on darker canvases. You might think this seems obvious but you're going to be PISSED if you spend all that time tracing and you can't see the lines! Wipe off the excess chalk from the back of the template with a paper towel.

Step 4: Trace the outline onto the canvas using a pen. The tree outline I used looks really fun and whimsical but let me tell you...... it took a LONG TIME to trace and even longer to paint. Keep that in mind when you're designing a template.

Step 5: Start painting!

You can see how faint the trace lines are, I didn't use a dark enough color
Step 6: Take a Diet Coke/popcorn break and then keep painting!

Step 7: Rinse and repeat! I did a second coat for the tree and then I went and found some birds online I liked and I did the same with those( traced them with chalk on the canvas and then painted them).

 
I did it with the lettering too. We don't quite know for sure when our wedding date will be/if the venue we want will be available on the day we want so I left that off for now, but it will go on the right hand side once we know for sure.

 Now all we need are some thumbprints!

I'm so excited to start making things for my wedding and start getting things together for my closest friends' weddings! I did a super cute DIY "Will you be my bridesmaid?" gift for all the girls I'd like in my wedding, but I can't post them until everyone gets theirs!

Stay tuned! The year and a half of wedding extravaganzas has begun!

Sunday, November 17, 2013

My Turn!

I haven't posted anything lately because I've taken a little break from Pinterest projects....It's been crazy busy and I just haven't had the time.

Never fear, my sister's wedding is less than a month away and I've got a few things I need to get done.

That and the fact that I'm going to have a TON of projects in the future! (Not so) Grizley Adams proposed this weekend! (He shaved his beard for the occasion so I'm going to have to find a new nickname for him).

Fiance pretending to be regretful.

I've already started planning a sweet DIY for my "will you be my bridesmaid" gifts. Once I send them out I'll make a post and give you a step by step on how to make your own!

The Proposal Story: He had been hinting around hardcore for a while so I knew it was coming. I was convinced it was this weekend until my sneaky cousin got involved and CONVINCED me he had a big plan for later on. She asked me and Grizley Adams to stop by and take some pictures of her and her fiance for their upcoming engagement shoot because they were arguing about where to have it and they wanted some "samples" at a mansion on the creek (I probably should've seen through this but she is a terrible liar so I totally believed her). We walk up on a dock and I start talking to them and out of the corner of my eye I see him get on one knee. He says "I surprised you! I'm not one for speeches, but you've been my best friend for three years and there is no doubt in my mind that I want to spend the rest of my life with you and I want that to start today.....Will you marry me?" Of COURSE I said yes! Then he turns me around and my bestie and her boyfriend are standing behind us taking pictures.


Everything was caught on camera and we have tons of pictures from when he got on one knee to when it finally sank in about twenty minutes later. It was fantastic. Then later we went to dinner at our favorite little restaurant with all of our family and friends. It was the perfect day!


Anyways....we're going to try to stay super budget conscious so that means a TON of DIY projects!  If any of you married ladies out there have any tips or advice please feel free to give it!

How to make  your own chalkboards on the cheap coming soon!

Sunday, November 3, 2013

Petal Icing on a Cake and Bachelorette Party!

I've made tons of cakes for a lot of different reasons and I think the easiest way to make your cake look awesome on the cheap is to ice it in an awesome way. It takes a little bit of time and patience, but it makes you looks like a super skilled cake expert and its ridiculously easy!

Here are some pictures of cakes I've done in the past. You can leave it plain and it looks awesome or you can add candles, a topper, bunting.....whatever your little heart desires!


I made one for my sister's bachelorette party this weekend so I took a few pictures so I could show you guys how to do it!

Things you will need:

-2 boxes of cake mix/stuff to make the cakes
-2 Circular cake pans, your choice of size
-Whipped cream cheese icing
- Powdered Sugar
-Food coloring (optional)
-Icing spatula (smaller is better)
-Whatever you want to use to decorate the top
-Gallon Sized Ziplock bags

Step 1- You'll need to make 2 round cakes, you can use whatever size you want, however big (or small) you need. I used 9 inch cake pans and Betty Crocker cake mix because I'm lazy super busy and don't want to have time to make them from scratch. You can make it from scratch if you want, more power to you Martha Stewart! Which ever way you decide to do it, make sure you THOROUGHLY grease your pans so the cakes slide out when you're done, thats really important!

Step 2- Bake your cakes.

Step 3- Once the cakes are done, flip them out of the pan and use a long knife and cut the tops off of the cakes, so that they lay fat once they cool and get stacked.


Step 4-While you're waiting for the cakes to cool, put the icing into a bowl (I use 2 cans on a cake like this) and add food coloring (if you want it to be colored). I also add about a 1/2 cup of powdered sugar, this makes it stiffer and its easier to do the icing technique. Keep the icing in the fridge until you're ready to use it.

Step 5- Once its cooled, put one cake on whatever its going to lay on (a plate, cakestand, whatever) and then put a layer of icing on top of the first layer. Stack the second cake on top. Once you have the cakes lined up how you want them put on a thin layer of icing. I call this the "crumb layer" because there will probably be those annoying little crumblies in it. But that's ok because you're going to add another layer anyway and you wont be able to see it.

Step 6- Take a gallon sized plastic ziplock bag and snip off the corner, not TOO much because you don't want the dot size to be too big. Fill the bag with icing and make one column of dots down the side of the cake. After you have ONE column take your spatula, put in on top of the dot, push down and smear to the right. Do with each dot in the column. Then make another column of dots and repeat.....over and over and over again. Then once you get all the way around do the same for the top of the cake.


Tips:
- After you do about every 2 dots you'll want to keep the icing bowl nearby so that you can wipe the spatula on the edge and get all of the excess icing off. This will make sure you get a clean swipe.

- If your icing starts to get runny its just because its getting too warm. Take a break and stick it in the fridge for about 10 minutes. OR you can keep another bag in the fridge and when one starts to get runny swap them out.

-When you come full circle and get back to where you started there will be a little seam. My suggestion is to use a butter knife and smooth it out the best that you can. Make this the back of the cake so no one can see in photos :)

Step 7- Decorate as you see fit, add your topper, candles, etc and let the icing set overnight.

Step 8- Bring your cake to whatever event you made it for and stand back while everyone compliments you on what a culinary genius you are! You can tell them its Betty Crocker or you can pretend that you belong on the next episode of cake wars....totally up to you!

This was the end product for my sister's bachelorette cake....pretty hilarious if I do say so myself. I call it Hot Mess Barbie.


So that's it for making a petal cake but I also wanted to share some fun pictures of the bachelorette party we had this weekend. Its so nice when all the hard work you put in on all these little details come together and pay off!


We got so many compliments on the homemade tee's I made! And we got a ton of attention walking through the park, people shouting at us and congratulating my sister, Epcot was definitely a great place to have it. Everyone had a blast and the food and (many, many, many, many, many) drinks were all delish!

It rained all morning and we got SOAKED, but it cleared up and we drank through the bad weather!

The bride on our way up in the decorated Bachelorette-mobile   


You can really see the t shirt in this picture from Germany, where we indulged in several beer flights with new friends

Everyone who came to Epcot on a ride while we we're waiting out the rain

We all got matching ponchos but they we're see through and people were sill loving our shirts through them!
Once the rain cleared it was beautiful and a perfect day for drinking around the world (this was Chinese beer)
The going out photos from that night.... well lets just say that what happens at Disney, stays at Disney.